2D fitting |

Most data fitting carried in this group involves kinetic analysis of transient reaction kinetics. This page will provide practical guidance in kinetic fitting, but general approach is applicable to other processes. The goal of kinetic analysis is to identify number of processes involved, as well as finding their rates and amplitudes.
Step-by-step recommendations:Prepare data for fitting.
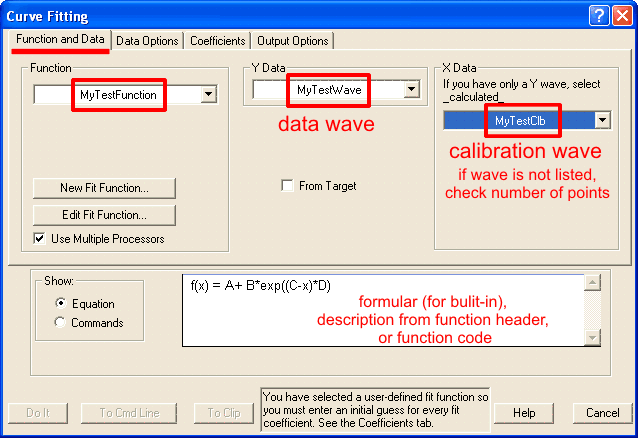
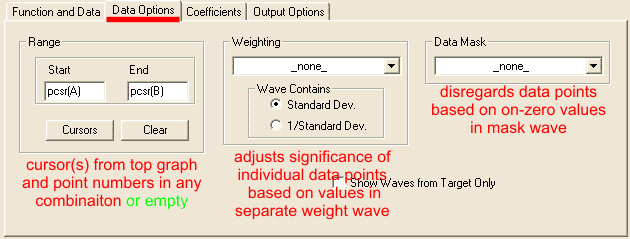
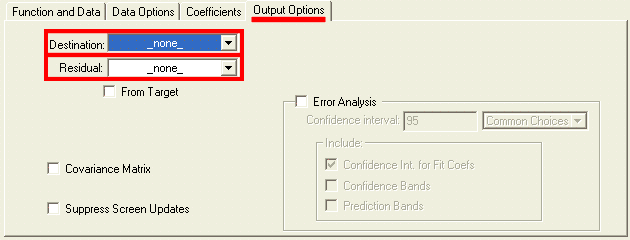
Choose fitting function.This is the most critical and creative part of fitting analysis, that draws most heavily on external knowledge. We know that under typical transient kinetics conditions changes in concentrations of species over time will occur exponentially. Therefore, we can limit selection of dependence to exponential functions. Number of exponents involved, however, is often not known and needs to be found. From the principle of the least number of parameters we choose single exponential function as the starting point. Knowledge of reaction mechanism is very helpful in increasing accuracy of fitting. Devise expression for relative concentration of each intermediate and add them with individual intensity coefficients (molar extinction in spectroscopy). If nothing is known about mechanism, use generic function. Consider behavior at the reaction start as described above, include correction if necessary. Keep in mind that Igor has time-corrected version of single- and double-exponential functions. Consider possible intensity offset and/or drifts which are present in most cases to some extent. If in doubt whether correction is needed or not, use simpler version. Necessity of correction will be more apparent after a round of fitting. Set up fitting dialog:Fitting dialog can be accessed at Curve fitting from Analysis menu. Carry the first round of fitting from dialog, while subsequent rounds can be done from command line. With the exception of setting up initial guesses, fitting to built-in and user-defined functions are identical. Set up function and data tab: While you can proceed with fitting without X Data (calibration wave), it is strongly discouraged. There are only few cases where fitting can be done meaningfully without X calibration. If you cannot find the calibration wave that you expect to see - make sure that both data and calibration waves have the same number of points, otherwise fitting dialog will not list calibraiton wave. Data optionsInput dataData options tab specifies what part of dat and how will be considered in fitting: Weighting allows to assign different importance (weight) to each point in the data set. If no weight wave is specified, a value of unitiy (1) is used for all points. When a weight wave is provided, Igor will make larger emphasis on fitting positions where weight value is larger and neglecting points with zero weight (N.B. Igor manual recommends to use mask wave to elliminate points completely). A rare case of when weithing may be necessary is when you know there is an intense early kinetic phase but due to time resolution you do not have enough points for Igor to recognise this phase automatically. Specifying data mask wave istructs Igor ignore points with zero value in the mask wave. Points with any non-zero value willbe considered. Using mask allow to reduce interference from occasional atrifactual data, such as cosmic ray spike or accidental blocage of probe beam. Note that both weight and mask waves must have the same number of points as data wave to be listed in corresponding drop-down menus. If you are using a built-in function you can skip setting coefficients options. Remeber that by default output coefficients are stored in W_coef wave in case you want to copy them to another wave or display in a table. Output dataOutput Options tab specifies the desired feedback for fitting results: Primary feedback tool is an overlay of fiting results over original data on th etop graph. This option is controlled by the Destination drop-down list:
Residual drop-down list specifies options for dispalying the difference between your original data and the result of fitting:
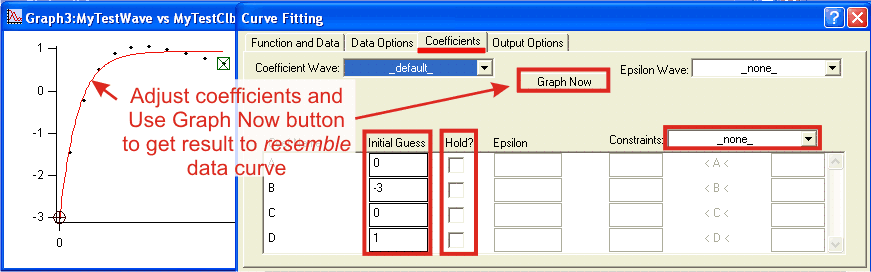
GuessesIf you are using a user-defined fit functions you must set up initial guesses for all parameters: In complex fitting models it is sometimes useful to fit values of some processes while holding others before allowing all parameters to vary freely. Hold checkbox stops Igor from adjusting a particuar parameter while still using it in calculation. A less severe limitation can be applied through Constraints wave. When From Coefficients List is chosen from a drop-down menu, you can specify lower, upper or both limits for acceptable value for each parameter. Such constraints are not limited to constant numerical values, but can include other parameters in the fit. By default Igor creates and used T_Constraints wave in the current folder. You can create your own constraint wave wave in any folder. Constraint wave is a text wave with the number of entries equal to the number of constraints, not the number of parameters. Each line must contain one constraint in text form: K0 < K1+K2*2.5 or K3 > K1 * 10. Note that realtionship constraints K0 < K1 are using K0, K1 etc notation in reference to coefficients. This applies to constraints in From Coefficients List in Curve fitting dialog as well, even though parametes are listed as they were named in function (A, B, t0 etc). Do the fitOnce all prepartion has been done, click Do It button and let Igor do the hard part. Depending on your data size, complexity of function and required confidence level, fitting may take from a fraction of a second to several hours. There is little you can do during fitting process except for interrupting it if you see that fit is diverging and parameters assume unreasonable values. During fit you will see a progress dialog which displays results of the last iteration. You will have to remember which K parameter corresponds to those third and fifth exponential rate constants is you want to track the progress. Analyze the resultsUpon completion, results of fitting are reported in the history area. Examining this report is the first stage of analysis.There are three possible outcomes:
Once the fit has converged, proceeed to the second stage of analysis: visually examine how close is your fit to the original data. Overlay of the fit profiles and residuals pane are very helpful (see suggestions). In visual examination look for mismatching patterns, paying attention to entire range of data. Deviation over the few first or last points may suggest the presence of an additional - faster or slower - process (see suggestions). If you had limited the data range in input data options, calculate fit results for the entire range - extrapolation to unusualy high/low values at time zero and at longer time may suggest that chosen function does not describe data as well as it could. Watch out for nonsence results such as negative rates, negative amplitides in absolute spectra, multiple rates with close values etc. Upon completion of the second stage you need to decide if the fit results were adequate. If you are not satisfied with the fit, revise you fitting function, alter initial guesses, or apply constraint / hold to parameters and repeat the fit. When you are satisfied with the resutls, proceed to the third stage of analysis, which should involve involve knowledge beyond current data set. This may include a priori knowledge about phenomenon from the first principles, other studies, or other measurements within the series. Compare fitting results at different concentrations or profiles at different wavelengths. Keep in mind that various phases of the same process may be resolved better or worse at different wavelengths. Practical suggestionsUse fit and residual overlay plots in visual analysis. To help you compare original and computed data, set the mode of original data trace to Markers (double-click trace to bring up Modify Trace Appearace dialog) and set fit results trace to lines betwen points. If your plot has several datasets, distinguish them by color. Use logarithmic time axis mode for kinetic data - Mode box in Modify Axis dialog. Visually Log axis gives the same weight to all kinentic phases. This is especially important for very fast and very slow phases, which are hard to see using linear axis. Keep in mind, however, that you can not see data at negative times on log scales. Kinetics of early phases in reactions that started with a delay will look distored on log axis, although this will not affect the fit. Consider applying an offset to time calibration. Make a table with fit coefficients wave (default W_coef wave). This wave will be updated with results upon completion of fit. If you are fitting to a user fitting function, values in this wave will be used as initial guesses . Likewise, if you are using constraints, display and edit constraints wave in a table. You can display both the coefficients and constraints waves in the same table. When fine-tuning coefficients use command line, instead of dialog. Earlier execution of fitting dialog will leave literaly command in the history area (Ctrl+J). The first line of fitting report contains information about all options you seledcted for that fit: In complex exponential fitting use constraints. One of the easiest types of constraint is the limit on how close the rates of phases can be. In most cases of conventional fitting, concurrent phases that differ less than 20-50% in their rate constants will likely not be resoved. Applying a constraints K0>K1*1.5; K1>K2*2 etc. Use hold to approximate phases that are not well resolved in data set. Every coefficient used in fitting affects every other. Even though you may not be able to get a reliable fit for very fast or very slow phases, it might be better to estimate and hold their rates rather than completely ignore them. In general, it is difficult to get a good fit for a phase if less than half of its amplitude is represented in the data. Nevetherless, presense of such partial phase may affect the fit of better resolved phases. To make an estimate of partially resolved phase, use Graph Now button in coefficients tab of fitting dialog while making manual adjustment. When reasonable value is found set hold flag for corresponding coefficient(s) and run the fit. Making and estimate will be easier if you run a round of fitting first to get an idea about other parameters. Use fitting report from history window. Each successful fitting leaves a "hardcopy" printout of results in the history. Most of the results are reported in such a form that you can directly copy-and-execute them. For example, you can restore values of coefficients by executing the |

| Comments |