| In Igor select Load Waves from Data->Load Waves menu or press Ctrl+L |
 |
| Import settings in Igor depend on whether you want to import data as a 2D (regular) spectrum or a 3D (matrix) spectrum. |
Importing 2D (regular) data |
|
When loading 2D data make sure Load columns into matrix is deselected.
Clear Read wave names checkbox.
Click on file and naviagte to your ASCII data file.
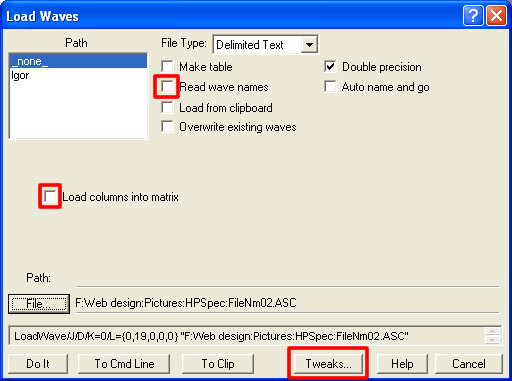
Click Tweaks button and set it as shown below.
When all done, click Do It button.
|
In Tweaks dialog, type number 19 for the first line contaning data. You can check this number by opening you data file Notepad and counting number of lines to first row of values.
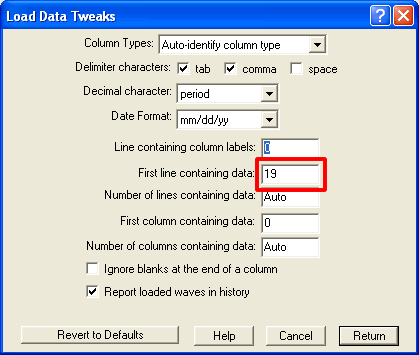
Click Return then Do It in preceeding dialog.
|
The follwing screen will provide a preview of data being loaded. Verify that it is what you expect. For example, check if first value of calibration matches. In this example it is 190nm, which is the low wavelength range of HPSpec.
Dialog will provide default names for all columns that it find. Change them to something meaningful so you would know how to find your data among 25 others that you will load.
In this example, the first column is given name wln_clb because it is wavelegth calibration. The second column is absorption values and its name is My_Sample01. The third column is standard deviation; since we do not need these values clear wave3 from third box and hit TAB key - Igor will automaticaly insert _skip column_ and willnot load it.
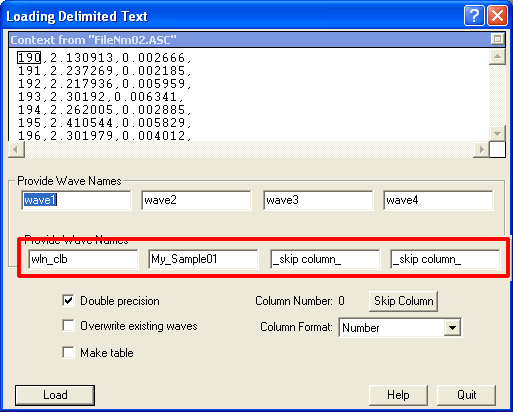
When loading multiple spectra from HPSpec typically wavelegth calibration needs to be loaded only once, unless you changed acquisition range.
Finally click Load button.
|
History will report your last operation, including file name, names and dimensions of loaded waves.

2D Import is finished. |
Importing 3D (matrix) data |
| When importing Wave in to a matrix wave, enable Load columns into matrix check box - menu will change to what is shown here.
For HPSpec ASCII files enable both Read row positions and Read column positions options.
From drop-down menus enable Create row position wave for both rows and columns.
Give your wave a meaningful name under Base name for matrix. Keep in mind that you will be creating three waves: MyName, CP_MyName, and RP_MyName. The latter two stand for Column Position wave and Row Position wave.
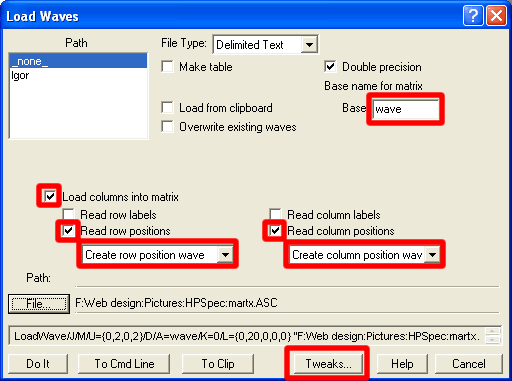
Click on Tweaks to set data row.
|
For data that were turned in to a matrix within HPSpec set first line containing data to 20. If you are importing multiple individual spectra and want to make a matrix, keep this value at 19 as for 2D files. In any case, verify that you get matrix dimention that you expect.
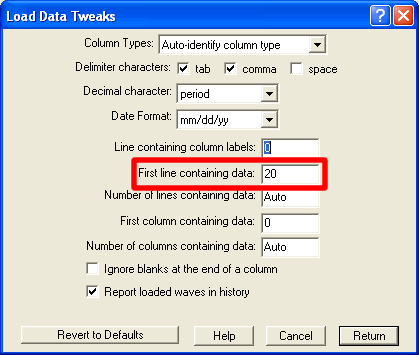
Return to previous dialog by clicking Return and click Do It button.
|
Read the history output. Check matrix size and note names of waves that were created.

You may want to make a table with CP_ and RP_ wave as a reference to which is wavelength and which is time.
3D import is finished |
| |


