GaussView Basics
The main GaussView interface consists of several windows, in addition to other dialogs which appear in the course of working. Figure 1 illustrates a simple session in which the user has just started to build a molecule.
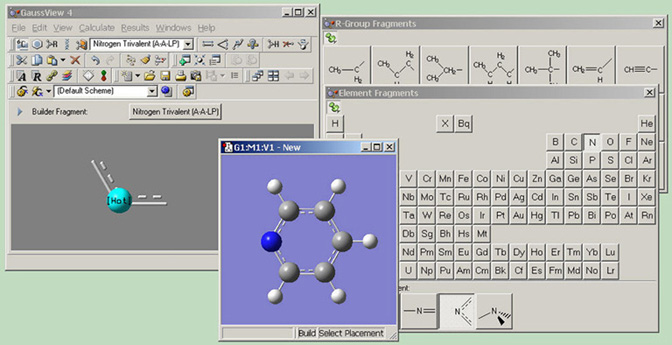
Figure 1. GaussView on the Desktop
Several GaussView features are visible here: beginning at the upper left and moving clockwise, we see the main GaussView control panel, containing the menu bar, a variety toolbars, and the Current Fragment window. Next, we see the palettes used to select functional groups and individual atoms for addition to a molecule (note that these can function in a modal or amodal mode, according to user preference). Finally, we see the active view window containing the molecule being built.
The GaussView interface consists of these main components:
- The control panel containing the menu bar and Current Fragment display.
- Various toolbars. By default, these are placed below the menu bar in the control panel, but they may also be detached if desired (see Figure 3). They may also be rearranged within the control panel as desired (so your window may differ from the illustration in Figure 1).
- One or more molecule view windows.
- Dialogs corresponding to the various GaussView features.
- Preferences which control various aspects of the program’s functioning.
The toolbars that appear by default under the menu bar in the GaussView control panel are illustrated individually in Figure 2. The Builder toolbar can also appear as it does in the illustration on the right, when selected with View=>Builder. You can detach an individual toolbar from the main toolbar by grabbing the handle and dragging it out of the toolbar area. To reattach a standalone toolbar, either drag it back into main toolbar or double click it.
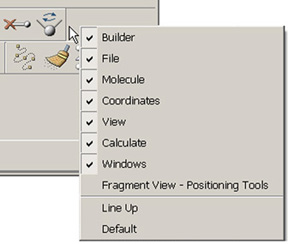
Figure 2. Toolbar Context Menu
If you right click in the grey area within any toolbar, you will bring up the Toolbar context menu. The first section of the list are the names of the toolbars that are available in that window. Selecting one of the toolbar names from the list will toggle it between its visible and hidden states. The Line Up option cause the toolbars to move to eliminate empty space between them, and the Default option restores the default configuration for that toolbar (when applicable).
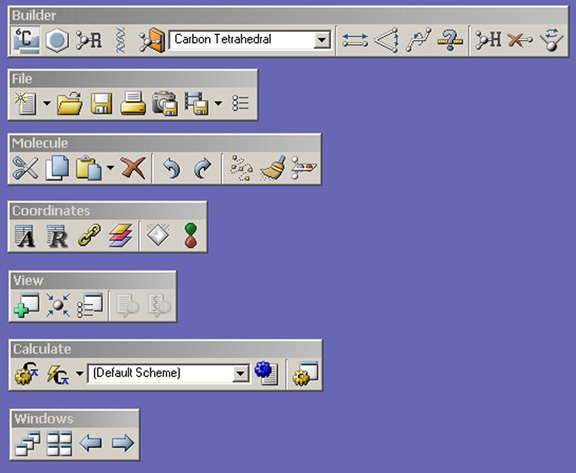
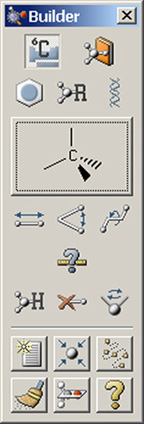
Figure 3. GaussView Toolbars in Standalone Mode
The Builder palette on the right is revealed with the View=>Builder menu path.
Molecules, Molecule Groups and Views
GaussView uses these constructs to organize the many molecules which may be being worked with at any given time:
- A molecule is most often a single molecule being worked on in isolation from other ones that may also be open. A molecule generally corresponds to a single file stored on disk. These are also sometimes referred to as models. Note that a molecule in this sense may contain more than one chemical species (i.e., “molecules” in the usual chemical sense).
- If there is more than one window open for the same molecule, the various different ones are referred to as views. Thus, a view window displays a molecule, and different views can show different orientations of and properties of the same molecule.
- A molecule group is a collection of one or more molecules that are worked on as unit. Molecule groups containing more than one molecule display each one in a separate subwindow of a combination view window (see Figure 4). Molecule groups are also referred to as model groups.
For molecule groups containing more than one molecule, there are two display modes. Single view mode displays a single molecule at a time. The current molecule number appears in the toolbar.
Clicking the single/multiview icon brings up multiview mode in which several molecules can be viewed at one time. The molecules are laid out side-by-side like frames in a film strip. The molecule number is shown just below the individual molecule frame. The currently active molecule is shown with a slightly lighter background to distinguish it from the other molecules and is the one involved in atom selections or in the dialogs. Clicking on one of the individual molecule windows that is not the active molecule window will cause it to become the active molecule. In the event that not all of the individual molecules can fit in the view window, a scroll bar will at the bottom of the view window allows one to move between the different the different molecules.
If the view window is expanded in the horizontal direction, more and more of the molecules will be shown until all of them are visible. After all of the molecules are visible, if the user continues to expand the window in the horizontal direction then empty space will be shown. If the view window is expanded in the vertical direction, then each individual molecule window is expanded in the vertical direction to match the window and correspondingly expanded in the horizontal direction. Thus, the vertical direction can be used to control the relative sizes of the individuals molecules.
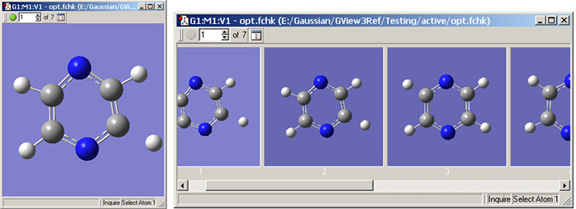
Figure 4. A Molecule Group Containing 20 Molecules
The controls in the toolbar appear only when there is >1 molecule in a molecule group. The single/multiple view icon toggles between single window (left) and multi-window view (right).
The title bar of each view window displays information about the current molecule group, molecule and view: each distinct molecule group is identified by an icon whose color is uniquely associated with it. Figure 5 shows the color icons from three different view windows (each corresponding to a different molecule group). All dialogs that are directly associated with that molecule group will use the same color icon to visually associate themselves with their parent molecule group (including new views created using View=>Add View). This color icon is also used to identify the molecule group in the Windows menu.

Figure 5. Color Icons from 2 Different Views
The icon on the left corresponds to the 4th molecule in the 1st molecule group, while the one on the right is the 2nd view of the 1st molecule in the second molecule group. This same color icon will appear in all dialogs associated with that molecule. For some operating systems, the color icon is located in the status bar.
In addition to its color icon, each view window is uniquely identified by its group/molecule/view identifier. This identifier consists of the molecule group (G), the molecule number (M), and the view number (V). Each of the molecules in a molecule group are numbered sequentially starting at 1. If a molecule in the group is deleted, the molecules are renumbered to maintain a continuous sequence.
Note that dialogs corresponding to molecule editing function are molecule-specific. If you activate a different view window with, say, the Atom List Editor open, its context does not follow. Examine the header label of a dialog in order to determine the corresponding view window.
For molecule groups containing more than one molecule, a special toolbar will be present just below the header. Clicking on the green run button will cause the view window to show each molecule in the group sequentially and continue to cycle through the full list until stopped. This has the effect of visually animating the sequence of molecules like a movie. This can be particularly useful for animating a series of related geometries, such as a Reaction Path plot. When the green run button is pressed, it turns into a red stop button, which will stop the animation.
The animation speed can controlled by the user. For an individual view window, the animation delay can be changed in the Display Format dialog’s Molecule tab. The default animation delay is set in the Display Format preferences.
Right clicking anywhere within a molecule window will bring up a context menu. The contents of the context menu duplicates much of the Builder, the menu bars, and the toolbars. This is provided as a convenience for the user.

Figure 6. View Window Context Menu
Each of the options on the context menu brings up a submenu containing related items.
Using the Mouse
Interaction with molecules is designed around the movements of a three-button mouse. The functions of the mouse buttons are described in the following table:
Mouse Button |
Action |
Function |
| 3-Button |
1,2-Button Equiv. |
| Left |
Left |
Click |
Select or insert item. |
| |
|
Shift-Click |
Add to current selection (in selection mode only). |
| |
|
Drag Left/Right |
Rotate about Y axis. |
| |
|
Drag Up/Down |
Rotate about X axis. |
| Center |
Shift-Left |
Drag |
Translate molecule. |
| Right |
Ctrl-Left |
Drag Left/Right |
Rotate about Z axis. |
| |
|
Drag Up /Down |
Zoom in and out. |
| |
|
Click in an open area |
Display context menu. |
| |
|
Shift-Click on atom |
Highlight corresponding row in Atom List Editor. |
Note that these mouse actions are active in any molecule display (including ones in GaussView dialogs).
Limiting Mouse Actions to One Fragment
If two items are not bonded to one another (not connected by visible chemical bonds on the screen), you can manipulate them individually on screen by holding down the Alt key and moving the cursor. When you use the Alt key, only the fragment closest to the cursor is affected. Thus Alt-Shift allows you to drag only one fragment.
GaussView Menus
GaussView contains the following menus, which have the indicated general purposes:
- File: Creating, opening, printing and saving structures and movies, as well as setting GaussView preferences.
- Edit: Performing molecule building and configuration tasks.
- View: Managing and interacting with the display of molecules.
- Calculate: Setting up and submitting Gaussian calculations and viewing current GaussView-initiated jobs.
- Results: Examining calculation results, including surfaces, spectra, plots, and animations.
- Windows: Managing the various GaussView windows.
- Help: Viewing help files for GaussView and Gaussian, as well as GaussView tips.
Table of Icons and Menu Items
The following table lists the available icons and menu items along with their functions. Most items will be described in more detail in future sections of this book. Note that on Mac OS X systems, the Equivalent Key modifier is the Command key, not the Control key.
Icon and Button Name |
Menu Path |
Purpose |
Equivalent Key |
 New New |
File=>New |
Create a new molecule (per submenu selection). |
|
| |
File=>New=>Create
Mol. Group |
Create a new (one-member) molecule group as an empty view window. |
Ctrl-N |
| |
File=>New=>Add to
Mol. Group |
Add a new molecule to the current molecule group. |
Ctrl-Shift-N |
 Open Open |
File=>Open |
Open files supported by GaussView. |
Ctrl-O |
| |
File=>Recent Files |
List of recently-opened files for easy reaccess. |
|
| |
File=>Related Files |
List of files related to the current molecule (e.g., input file, log file, checkpoint file, etc.). |
|
| |
File=>Refresh |
Reload current file in active view window. |
|
 Save Save |
File=>Save |
Save molecule(s) in the active molecule group to file(s). |
Ctrl-S |
| |
File=>Save Temp Files |
Save any temporary files associated with Gaussian Quick Launch jobs. |
|
 Print Print |
File=>Print |
Print the contents of the active view window. |
Ctrl-P |
 Save Image Save Image |
File=>Save Image File |
Produce a graphics file of current view window. |
|
 Save Movie Save Movie |
File=>Save Movie |
Save movie file, movie frame files, or both. |
|
 Preferences Preferences |
File=>Preferences |
Specify defaults for aspects of GaussView’s behavior. |
|
| |
File=>Exit |
Close all Gaussview windows and exit application. |
|
 Undo Undo |
Edit=>Undo |
Reverse the previous editing action and maintain a list of previous actions. |
Ctrl-Z |
 Redo Redo |
Edit=>Redo |
Reverse the previous Undo operation. |
Ctrl-Y |
 Cut Cut |
Edit=>Cut |
Cut the current selection to clipboard. |
Ctrl-X |
 Copy Copy |
Edit=>Copy |
Copy the current selection to clipboard. |
Ctrl-C |
 Paste Paste |
Edit=>Paste |
Copy clipboard contents to the current model(per submenu selection). |
|
| |
Edit=>Paste=>Add to Molecule Group |
Add the molecule on the clipboard as a new model within the current model group. |
|
| |
Edit=>Paste=>Replace Molecule |
Replace current molecule with clipboard contents. |
|
| |
Edit=>Paste=>Append Molecule |
Add molecule on the clipboard to the current model as a separate fragment. |
|
 Delete Molecule Delete Molecule |
Edit=>Delete Molecule |
Remove the current selection. |
Ctrl-Del |
| |
|
Copy the contents of the active view window to the clipboard. |
Ctrl-I |
 Atom List Editor Atom List Editor |
Edit=>Atom List |
Edit the molecule’s numerical coordinates/parameters. |
|
 Redundant Coord. Editor Redundant Coord. Editor |
Edit=>Redundant |
Specify redundant internal coordinates for the Gaussian ModRedundant option. |
|
 Connection Editor Connection Editor |
|
Specify corresponding atoms in two related molecular structures (e.g., for QST2 or QST3 input). |
|
 Select Layer Select Layer |
Edit=>Select Layer |
Assign atoms to layers graphically for ONIOM calculations. |
|
| |
|
Specify/impose symmetry on the current model. |
|
 Crystal Editor Crystal Editor |
Edit=>PBC |
Create and modify unit cells for periodic structures. |
|
 MO Editor MO Editor |
Edit=>MOs |
View, reorder and modify occupancy for molecular orbitals. |
|
 Symmetrize Symmetrize |
Edit=>Symmetrize |
Apply point group symmetry to the current model. |
|
| |
Edit=>Reorient |
Restore canonical molecule orientation. |
|
 Rebond Rebond |
Edit=>Rebond |
Recompute the bound atoms, identifying bonded atoms based on a distance algorithm. |
|
 Clean Clean |
Edit=>Clean |
Adjust molecular geometry according to a defined set of rules to more closely match chemical intuition. |
|
| |
Edit=>Mirror Invert |
Invert the molecule around the selected atom. |
|
 Add View Add View |
View=>Add View |
adjustable view of the current molecule. Create a new view window, with an independently |
|
 Center Center |
View=>Center |
Center molecule in the view window (adjusts size). |
|
| |
View=>Builder |
Close or reopen the separate Builder palette. |
|
| |
View=>Hydrogens |
Control the display of hydrogens in view window. |
|
| |
View=>Dummies |
Control the display of dummy atoms in view window. |
|
| |
View=>Labels |
If selected, label each atom with its the sequence number in the list of atoms. |
|
| |
View=>Symbols |
If selected, display the chemical symbol for each
atom in the view window. |
|
| |
View=>Bonds |
Controls the display of bonds in the view window. |
|
| |
View=>Synchronize |
Link views to synchronize mouse-based manipulations. |
|
| |
View=>Cartesian Axes |
Control the display of X,Y,Z axes in the view window. |
|
| |
View=>Stereochemistry |
Indicate molecule’s stereochemistry by labeling relevant atoms as R or S. |
|
| |
View=>Positioning Tools |
Display the positioning tools icons in the view window toolbar. |
|
 Display Format Editor Display Format Editor |
|
Specify the display format for molecules and surfaces. |
Ctrl-D |
 Calculation Setup Calculation Setup |
Calculate=>Gaussian Calculation Setup
|
Set up Gaussian input for the molecular structure in the current view window and optionally run the job. |
Ctrl-G |
 Quick Launch Quick Launch |
Calculate=>Gaussian Quick Launch
|
Run a Gaussian job for the curr. molecule, bypassing the setup dialog. |
|
 Scheme Scheme |
Calculate=>Gaussian Calc. Scheme
|
Define and modify Gaussian calculation schemes. |
|
 Current Jobs Current Jobs |
|
Display currently running GaussView-initiated Gaussian jobs (including cubegen and freqchk). |
Ctrl-J |
| |
|
Provide summary data of the results of thecalculation after a results file is opened. |
|
| |
Results=>Charge |
Display partial charge density, as computed by various Gaussian methods. |
|
| |
Results=>Surfaces/Contours
|
Create, load, save and display surfaces. |
|
| |
|
Display calculated vibrational and other spectral data, including normal mode animation. |
|
| |
Results=>NMR |
Display calculated NMR spectra. |
|
| |
Results=>UV-VIS |
Display predicted UV/Visible spectra. |
|
| |
Results=>Scan |
Display plots of potential energy surface scans. |
|
| |
Results=>IRC/Path |
Display plots of predicted IRC paths. |
|
| |
Results=>Trajectory |
Display trajcectory plots from ADMP or BOMD calculations. |
|
| |
Results=>Optimization |
Display plots of geometry optimization results. |
|
 View File View File |
Results=>View File |
Start an editor session for the log file for the current molecule. Can also be used to view the Gaussian input file that was opened for the current molecule, provided that nothing has been modified. |
|
 Stream file Stream file |
Results=>Stream File |
Display output from a currently running Gaussian calculation as it becomes available. |
|
| |
Windows=>Molecule Groups=>Show All |
Display windows for all model groups. |
|
| |
Windows=>Molecule Groups=>Show None
|
Hide windows for all model groups. |
|
| |
Windows=>Molecule Groups=>Name
|
Display windows for the specified model group and make it the current view. |
|
| |
|
Minimize all view windows. |
|
| |
|
Raise active view window. |
|
| |
|
Open all minimized view windows. |
|
| |
Windows=>Close |
Close the active view window. |
|
| |
|
Close all open view windows. |
|
 Previous Previous |
Windows=>Previous |
Activate the previous view window in sequence. |
PgUp |
 Next Next |
Windows=>Next |
Activate the next view window in sequence. |
PgDown |
 Cascade Cascade |
Windows=>Cascade |
Arrange all view windows in an overlapped pile. |
|
 Tile Tile |
Windows=>Tile |
Resize and rearrange view windows so that all are visible. |
|
| |
Windows=>Name |
Make the specified view window the active one. |
|
 Help Help |
|
Open the GaussView help file |
Ctrl-H |
| |
|
Access Gaussian help on the Internet. |
|
| |
|
Display the GaussView copyright and version information. |
|
| |
|
Display GaussView tips. |
|
 Elements Elements |
|
Open the elements palette. |
|
 Rings Rings |
|
Access a set of ring structures. |
|
 Functional Group Functional Group |
|
Summon a set of functional group fragments. |
|
 Biological Fragments Biological Fragments |
|
Summon amino acid and nucleoside fragments. |
|
 Custom Fragments Custom Fragments |
|
Access a custom fragment library. |
|
 Modify Bond Modify Bond |
|
Access Bond Smartslide dialog after two atoms selected. Adjust bond type and/or interatomic distance. |
|
 Modify Angle Modify Angle |
|
Access Angle Smartslide dialog after three atoms selected. Adjust bond angle. |
|
 Modify Dihedral Modify Dihedral |
|
Access Dihedral Smartslide dialog after four atoms selected. Adjust dihedral angle. |
|
 Inquire Mode Inquire Mode |
|
Examine structural data for the current molecule. |
|
 Add Valence Add Valence |
|
Add an additional hydrogen to the selected atom. |
|
 Delete Atom Delete Atom |
|
Eliminate atoms and/or open valences (dangling half bonds). |
|
 Invert About Atom Invert About Atom |
|
Invert molecular structure about a selected atom. |
|
 Frag Placement Frag Placement |
|
Open fragment placement options panels in control window. |
|
Icons found in the Active Model View window:
Icons found in the five Fragment Palette windows:
 Tacked Tacked |
|
Keep this palette open until explicitly closed (i.e., amodal
operation). |
|
 Untacked Untacked |
|
Close palette when a different one is opened (i.e., modal
operation). |
|
Icons related to various coordinate editing dialogs:
Miscellaneous icon:
 Browse Browse |
|
Select a file/directory via operating system browse function. |
|
GaussView Preferences
Default settings for many GaussView features can be customized via the preferences, which are reached with the File=>Preferences menu path. The following preferences are available:
- Building: Set default settings for advanced fragment placement options for all three sets (Default, Old and Custom).
- Charge Distribution: Specify desired settings for displaying atomic charge and dipole moment data.
- Clean Controls: Set the adjustable parameters and controls for the structure cleaning function.
- Colors: Customize the coloring of various GaussView displays.
- Desktop: Define file associations for extensions associated with Gaussian and GaussView files (Windows version only).
- Display Format: Set the preferred Display Format dialog settings for view windows.
- File/Directory: Set preferred directory locations for various GaussView contexts.
- Gaussian Setup: Set the preferred Gaussian Calculation Setup dialog settings.
- Icons: Set default icon sizes in the user interface.
- Image: Set the preferred values for capturing images.
- Job Setup: Define execution procedures for Gaussian and related jobs.
- Movie: Specify preferences for animations created by GaussView.
- Print: Set the preferred values for printing images.
- Vibrations: Set the preferred Display Vibrations dialog settings.
- Window Behavior: Set the preferred behavior for dialogs.
All of the preferences dialogs contain several buttons: Ok (save current settings and exit), Cancel (exit and discard unsaved changes), Default (restore GaussView’s installation settings) and Help (obtain online help). When you use the Default button, the dialog in Figure 7 will appear.
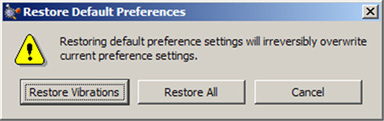
Figure 7. Restoring Default Preferences
When you click the Defaults button in the Preferences, you are given the choice of restoring all default preferences or only the ones pertaining to the current dialog.
We will consider two of the preferences here. The others will be discussed along with the relevant features in the course of this manual.
Specifying GaussView Window Behavior and Default Icon Sizes
The Window Behavior preference, illustrated in Figure 8, controls how various GaussView window types behave.
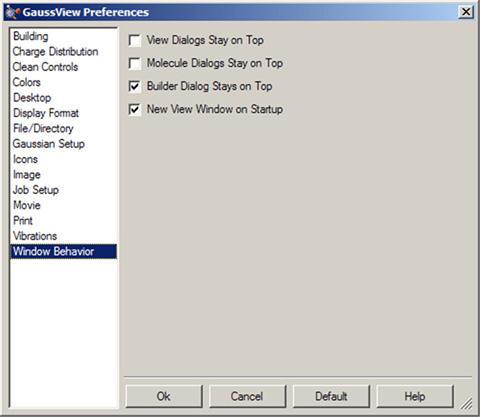
Figure 8. Window Behavior Preferences
These settings allow you to force certain window types to remain uppermost, as well as whether an empty view window is automatically created when the program starts.
The Icons Preferences allow you to specify the icon sizes for various GaussView windows. It is illustrated in Figure 9.
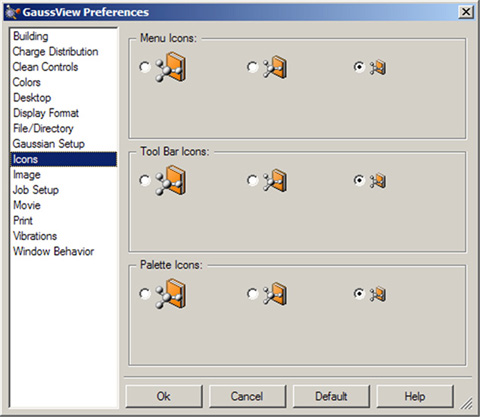
Figure 9. Customizing Icon Sizes
You can select larger icons for various GaussView windows with this preference.
The controls in the dialog control the icons for menus, toolbars and the standalone Builder palette. The defaults are small icons for the first two items and large icons for the third one.
Displaying GaussView Tips
The Help=>GaussView Tips menu path opens the GaussView Tips window, which displays various tips for using the program effectively. You can also choose to have a tip displayed each time GaussView starts up using the checkbox at the bottom of the window (the default is unchecked).
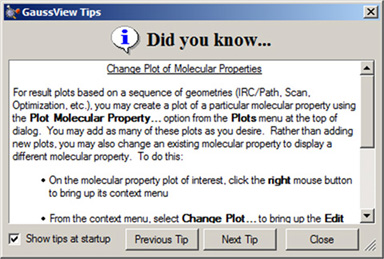
Figure 9a. GaussView Tips
Click Show tips at startup to view a tip each time you start GaussView.